Friday, October 12, 2012

A Harvest Count Down

   We are not big on Halloween, but we love the fall harvest season.  Since my kids dress up about 300 days a year and do dress up on Halloween, we just don't do the trick or treat thing.  We have alternate Halloween activities ranging from going to a church carnival or staying home and having friends over and OD on candy and junk food, play games, and run around the back yard with glow sticks.
   As of present, the jury is still out on what we are going to do this year.  I am leaving it up to the kids to decide.  They are both studying the middle ages this year and love reading about King Arthur, Merlin, and the knights of the round table.  They also read Robin Hood and we watch we just watch the series on Netflix.  So one idea the blue eyed one has mentioned is dressing up like characters from King Arthur and watch Merlin, make and eat a meal (stew and bread) like they did in the middles ages and digest a lot of sugar and chocolate.
 
   So in the meantime,  I made this cute pumpkin count down to whatever we end up doing on the 31st.  I didn't get pictures of the entire step by step, it was 110 degress on Sept 30 when I made this and it grossly effected my brain.
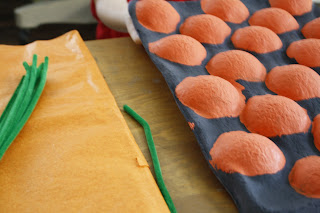
You need a few apple packaging trays from the grocery store.  The produce man was happy to give them to us while unpacking apples.
 Flip the tray over and paint each embossed circle orange.  It doesn't have to be perfect since we are going to cut them out.


 You will also need some orange tissue, green pipe cleaners, and either a hot glue gun if you are brave and fearless or white school if you are patient.

   Cut out each embossed circle and cut tissue into squares larger than the circles, I cut out 31 for each day of October.  Place candy, small pieces of candy, in each one and glue around the edge of the back of the embossed circle and let dry or cool depending on which glue you are using.  Once dry, trim off the excess tissue. 

  Cut the pipe cleaners into thirds, make sure you have one for each pumpkin.  Fold each one in half and twist the end and bend them up to look like leaves.
 
Glue onto the pumpkin.  Cut a piece of bakers twine, I used black, and hang from the mantel or a stair rail.  Fold the stem of the pipe cleaner over the twine and pinch it pretty firmly so it wont slide around.  After that break out a sharpie and number each one for the count down.  They blue eyed one did it for me. 

Tuesday, September 25, 2012

New DIY Coming Soon Featured in Romantic Homes

So excited about the DIY scratch off cards I put together for Romantic Homes December Issue!
The possibilities are endless!
Here is a peak at the graphic sheet for it plus the link to the download PDF here

More about the DIY coming soon!  Complete instructions in the December Romantic Homes issue.

Thursday, September 13, 2012

What in the World?

Did you know Rustoleum makes magnetic paint?
It is awesome, a little tempermental, but awesome.


So, I had this idea.  It all started when one of my kids was asking some kind of geographical education question that I can't remember now.  As I was attempting to show them on the glob, I realized how out of date my glob is, which I kind of knew already, since I bought it at a garage sale for .50 cents.

So my idea, make the glob more functional.

I thought, why not make it magnetic and a chalk board.

I wanted to draw the online of the continents after I painted over it, so I had this idea to outline the continents with a dimensional paint.


I had a few bottles of fabric paint on hand, so I used that to outline the continents.


I let it dry out side in 100 degree weather so it would dry fast, I was anxious to try the magnetic primer.


You need to stir the magnetic paint a lot, I mean really a lot!  Digging up the magnetic substance on the bottom of the can.  You also need to stir the can each time before you dip your sponge brush in, and yes, you need to use a sponge brush, this stuff is not nice to paint brushes or sinks.

I mixed up some chalk board paint using 1/2  cup acrylic paint and 1 tablespoon of unsanded grout.

Since I could see my dimensional lines, I drew over them with a white paint pen.  Then primed it by rubbing chalk over it.